
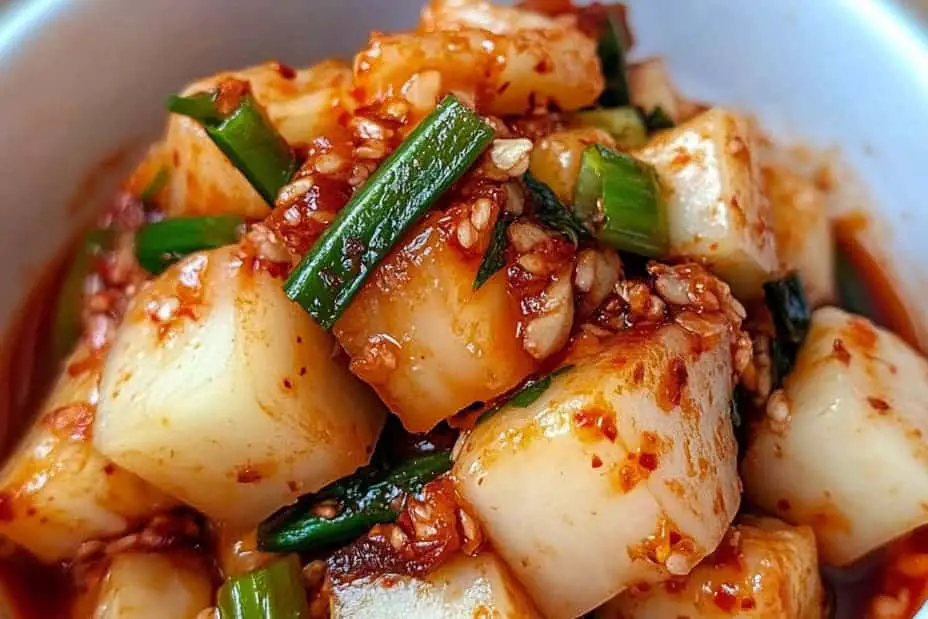
Radish Kimchi is a crunchy, flavor-packed Korean delight that perfectly captures the essence of traditional Korean cuisine. This invigorating dish combines the natural crispiness of radishes with a burst of robust flavors, making it a staple in Korean households. As a result, Radish Kimchi is loved not only for its taste but also for its health benefits. With probiotics from fermentation and essential vitamins from radishes, this dish is both delicious and nutritious.
Imagine savoring the delightful crunch of fresh radishes paired with a medley of spices and seasonings. Each bite of Radish Kimchi balances tangy, spicy, and sweet, creating a unique taste sensation. It adds depth to countless meals, including rice bowls, tacos, and sandwiches. While many may shy away from trying to make their own Kimchi, this amazing recipe provides an easy way to bring this Korean delight into your home.
Whether you’re new to Korean cuisine or a seasoned fan, this guide will reveal why Radish Kimchi is a must-try, how to prepare it, and tips for serving. Prepare to embark on an adventure through flavors and textures that will leave you craving more!
Why You’ll Love This Recipe
Radish Kimchi offers a variety of reasons to fall in love with its crunchy texture and vibrant flavors. Here are six reasons why making this dish at home is an incredible idea:
1. Easy to Make – This recipe is straightforward and doesn’t require advanced cooking skills.
2. Healthy Choice – Radishes are low in calories and packed with nutrients, making Kimchi a great addition to any diet.
3. Customizable – You can adjust the spice level to suit your preference, from mild to fiery hot.
4. Fantastic for Meal Prep – This dish holds up well in the fridge, making it perfect for meal planning.
5. Unique Flavor Experience – The fermentation process gives Radish Kimchi a complex tang that elevates any meal.
6. Great for Sharing – Making a large batch means you can share this delightful dish with family and friends!
These benefits highlight why Radish Kimchi should be a regular feature in your culinary repertoire. Each bite is a delightful experience that can easily accompany various dishes, from Korean BBQ to a simple bowl of rice.
Preparation and Cooking Time
Creating Radish Kimchi at home will take about 1 hour and 15 minutes, including preparation and marinating time. Here’s a breakdown:
– Preparation Time: 40 minutes
– Marinating Time: 30 minutes
– Total Time: 1 hour and 10-15 minutes
These times may vary depending on your kitchen pace, but this estimate should give you a good framework for planning your cooking session.
Ingredients
– 1 pound radishes (daikon or Korean radishes)
– 1 tablespoon sea salt
– 1 tablespoon sugar
– 2 teaspoons Korean red pepper flakes (gochugaru)
– 1 tablespoon fish sauce (or a vegetarian alternative)
– 1 clove garlic, minced
– 1 teaspoon grated ginger
– 2 green onions, chopped
– 1 tablespoon sesame seeds (optional)
Step-by-Step Instructions
Here’s how to create your own delicious Radish Kimchi!
1. Prepare Radishes: Wash and peel the radishes. Cut them into thin matchsticks or quarters.
2. Salt the Radishes: In a large bowl, sprinkle the radishes with sea salt. Toss until they are well-coated. Let them sit for about 30 minutes to draw out moisture.
3. Rinse and Drain: After 30 minutes, rinse the radishes under cold water and drain well to remove excess salt.
4. Make the Kimchi Paste: In a separate bowl, combine the sugar, Korean red pepper flakes, fish sauce, minced garlic, and grated ginger. Mix until a paste forms.
5. Combine Ingredients: Add the rinsed radishes to the paste. Toss well until all the radishes are coated.
6. Add Green Onions: Fold in the chopped green onions for added flavor.
7. Pack into Container: Transfer the Kimchi into a clean glass jar or airtight container, pressing down to eliminate air pockets.
8. Ferment: Let the Radish Kimchi sit at room temperature for about 5-6 hours to start the fermentation. Afterward, store it in the refrigerator.
9. Enjoy: The Radish Kimchi will develop great flavors over time, but it’s ready to eat after the initial fermentation!
These steps will guide you effortlessly toward preparing Radish Kimchi, allowing you to enjoy this crunchy delight soon!
How to Serve
To showcase your homemade Radish Kimchi beautifully, consider the following serving suggestions:
1. Serving Style: Serve the Kimchi in a small bowl alongside your main dishes to enhance the meal.
2. Pairings: This crunchy delight pairs well with rice dishes, grilled meats, and even as a topping for tacos.
3. Use as a Garnish: Chop finely and use as a vibrant garnish on salads or sandwiches for a flavorful kick.
4. Incorporate in Dishes: Think creatively; add Radish Kimchi to fried rice or noodles for an extra burst of flavor.
By serving Radish Kimchi thoughtfully, you will not only elevate the dining experience but also impress your guests with your culinary skills. Each taste of this vibrant dish is a testament to the richness of Korean cuisine. So gather your ingredients, follow these steps, and indulge in this amazing, flavor-packed delight!
Additional Tips
– Use Fresh Radishes: For the best crunch and flavor, ensure your radishes are fresh. Look for firm radishes without blemishes.
– Customize Spice Level: If you prefer less heat, reduce the Korean red pepper flakes. Alternatively, add more for a spicier kick.
– Experiment with Ingredients: Feel free to add in other spices such as black pepper or chili powder to create your unique taste.
– Serve with Variety: Try pairing Radish Kimchi with various dishes, like grilled fish, savory pancakes, or noodles, to discover new flavor combinations.
Recipe Variation
If you’re feeling adventurous, here are some variations on this classic Radish Kimchi recipe:
1. Vegetable Medley Kimchi: Add carrots or cucumbers for added flavor and texture. Simply slice them thinly and mix them with the radishes.
2. Korean Style with Apple: Add a grated apple to the Kimchi paste. This introduces a slight sweetness that contrasts beautifully with the spices.
3. Spicy Mango Kimchi: Mix in diced ripe mango for a fruity twist on the heat. It adds an exciting balance of sweetness and spice.
4. Nut-Free Option: Omit any nuts or replace sesame seeds with crushed sunflower seeds if you have a nut allergy.
Freezing and Storage
– Storage in Refrigerator: Your Radish Kimchi can be stored in an airtight container. It will stay fresh for up to 2 weeks in the fridge.
– Freezing Option: If you make a large batch, consider freezing some portions. Place them in airtight freezer bags, removing as much air as possible. They can last for up to 3 months in the freezer. Thaw in the refrigerator before consuming.
Special Equipment
To make Radish Kimchi successfully, you don’t need any special tools other than basic kitchenware. However, some useful items include:
– Large Mixing Bowl: For mixing your radishes with salt and the Kimchi paste.
– Cutting Board and Knife: For chopping the radishes and green onions.
– Glass Jar or Airtight Container: For storing your finished Kimchi during fermentation.
– Measuring Spoons: To ensure you add the correct amounts of spices and ingredients.
Frequently Asked Questions
How long does it take for Radish Kimchi to ferment?
Radish Kimchi can start fermenting in about 5-6 hours at room temperature. However, for deeper flavors, allow it to ferment for 1-2 days.
What if my Radish Kimchi is too salty?
If your Kimchi turns out too salty, try adding more fresh vegetables to balance the flavor or serve it with unsalted rice or grains.
Can I use other types of radishes?
Yes, while Korean radishes and daikon are traditional, you can experiment with other varieties like red radishes for different flavors.
Is homemade Radish Kimchi safe to eat after a while?
Homemade Kimchi can last for weeks in the fridge, thanks to the fermentation. However, if it develops an off smell or unusual color, it’s best to discard it.
Can I adjust the sweetness in my Kimchi?
Absolutely! Alter the sugar amount to your taste. For a natural sweetness, try adding grated pear or apple.
Conclusion
Radish Kimchi is a wonderfully versatile and delicious dish that can elevate any meal. From its crunchy texture to its explosion of flavors, it’s not only a staple in Korean cuisine but also an excellent addition to your culinary routine. Whether served as a side dish or incorporated into other recipes, Radish Kimchi has the potential to impress anyone fortunate enough to enjoy it. So dive into the world of homemade Kimchi, and relish in the delight of this exceptional dish!
Radish Kimchi: An Incredible Ultimate Recipe for a Crunchy Delight
- Prep Time: 15 minutes
- Cook Time: 1 hour
- Total Time: 1 hour 15 minutes
Ingredients
– 1 pound radishes (daikon or Korean radishes)
– 1 tablespoon sea salt
– 1 tablespoon sugar
– 2 teaspoons Korean red pepper flakes (gochugaru)
– 1 tablespoon fish sauce (or a vegetarian alternative)
– 1 clove garlic, minced
– 1 teaspoon grated ginger
– 2 green onions, chopped
– 1 tablespoon sesame seeds (optional)
Instructions
Here’s how to create your own delicious Radish Kimchi!
1. Prepare Radishes: Wash and peel the radishes. Cut them into thin matchsticks or quarters.
2. Salt the Radishes: In a large bowl, sprinkle the radishes with sea salt. Toss until they are well-coated. Let them sit for about 30 minutes to draw out moisture.
3. Rinse and Drain: After 30 minutes, rinse the radishes under cold water and drain well to remove excess salt.
4. Make the Kimchi Paste: In a separate bowl, combine the sugar, Korean red pepper flakes, fish sauce, minced garlic, and grated ginger. Mix until a paste forms.
5. Combine Ingredients: Add the rinsed radishes to the paste. Toss well until all the radishes are coated.
6. Add Green Onions: Fold in the chopped green onions for added flavor.
7. Pack into Container: Transfer the Kimchi into a clean glass jar or airtight container, pressing down to eliminate air pockets.
8. Ferment: Let the Radish Kimchi sit at room temperature for about 5-6 hours to start the fermentation. Afterward, store it in the refrigerator.
9. Enjoy: The Radish Kimchi will develop great flavors over time, but it’s ready to eat after the initial fermentation!
These steps will guide you effortlessly toward preparing Radish Kimchi, allowing you to enjoy this crunchy delight soon!
Nutrition
- Serving Size: 4-6 servings
- Calories: 35 kcal
- Fat: 0g
- Protein: 1g